
We are home from hanging in the room on the gulf coast, and while I wish we were out in the sun, the rain there forced some pretty special couch-cuddling, game-playing, lego-building moments. We hope you and yours had a happy 4th, too!
Since December 2009, when I started this blog, certain projects and posts stood out more than others, and we’ve been getting lots of questions and new readers lately, and they want to know about 2 spaces of ours in particular: the writing room & the playroom.
For those of you who are new(er) around here, we hope this post puts lots of project links and answers in one place for you!
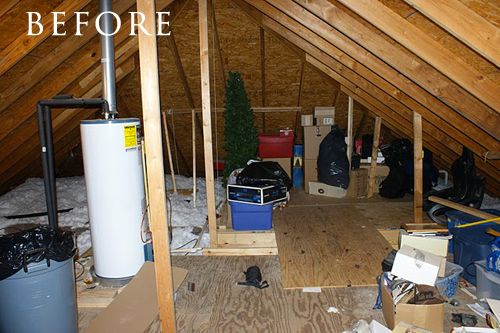
Right after starting our blog, we began tackling an attic renovation–technically, an attic addition. You can see from the before pic (of the writing room) we had built our home with the intention of finishing the attic one day by sub-flooring it & adding a stairwell for easy access. When it came time to finish it out, we hired out the framing, sheet rock, water heater relocation, & installation of AC. We then finished out the spaces with paint, trim, flooring, and adding all the furnishings…many of them built by us.
It was a long (5-6 months) process, but I have to say, it was really neat & inspiring to know we did so much of the work ourselves. Many of the projects and posts we wrote during that time are what got our blog growing, and much to our surprise, turning it into an actual job for me.
I love unexpected surprises like that!

The space started out as more of a guest room space, with the daybed as more of the focal point. P.S. The daybed is one of the most featured, visited projects on our blog, and yes, we did build it from the doors of my parents’ home. It is one of my most favorite and treasured pieces. You can read the reveal & the how-to posts.

Over time, we needed the space to serve as more of an office/inspiration space first, guest space second. We then did another redo of the writing room, adding shelves, swapping the desk & bed around, and building a removable plank wall to create a cozy nook for the daybed. You can read all about the resources on those posts.

The space is filled with pieces that inspire me, like this $15 vintage table…complete with an old jar. It is one of my favorite pieces in the house! We went with my go-to white for the walls/ceilings, White Diamond by Benjamin Moore in a satin finish.

After the daybed, we are most asked about our floors upstairs in the writing room and playroom. They are laminate and were from a discount lumber liquidation center in Montgomery, Alabama. They were on clearance & discontinuing and we’ve never been able to find them again. We LOVE the laminate floors up there…perfect for the kids. Even though we can’t share a link for our exact flooring, here is a similar choice from Lumber Liquidators.

On to the playroom…this space we created with little imaginations in mind. I wanted it light and airy, but full of color to invigorate and spur on their creativity & dreams. It was finished at the same time as the writing room (and theater), but this room has changed over time, too. In the beginning, it was wide open for baby play, but as the kids got older, we needed a table for art and (now) school. Matt built the x-table as a modified version of Ana White‘s kids picnic table.
We made the word art hanging over the playroom storage with wood scraps, scrapbook paper, craft paint & mod podge.

The room is painted in Valspar’s Sea Breath, and let me say, it is the perfect airy aqua, bright and fresh, but not too saturated…love it! The bead board, trim, and beams are again painted White Diamond by Benjamin Moore. (P.S. Books are Penguin & Puffin Classics & I order on Amazon)
Matt built the storage inspired by this Pottery Barn Kids set, but we made it taller and deeper to suit our needs. Speaking of Pottery Barn Kids, we also partnered with them for a study space challenge–and as shocking as it was, actually won!


We wrote about the finish on the x-table in my ebook, and it’s one of our favorite pieces still to date.
I hope this answers some questions about these spaces that work so hard for us and inspire us, too.


The rooms look amazing, and the pictures are perfect!
I love both of these rooms. I am going to have to check out some of the other post too since I am new. Did your house have stairs going up to your attic or did ya’ll add them? If ya’ll added them I would love to hear more about that. I would love to have a finished attic but stairs to get up there would be my biggest issue.
Hey Sheena, We sure did…we built the stairs when we built the house so we could finish it out one day and have full access.
🙂
shaunna
Good post. Those rooms are light and airy for sure! Glad y’all are home.
So did you add on to the attic? It seems like in the before picture the area is smaller than the refinished room. The reason I ask is that is about the same area as above my garage (in the before pic) and would love to refinish it but was wondering if you had to change the roof to get it to look like your finished product.
Hey Leslie! Nope…just different angles from where I shot with the camera. In the before pic, I’m standing in the middle of the full room, so all the angles will look differently. We did add more flooring about 10 feet back, but changed nothing on the ceiling pitch. Hope that helps!
🙂
shaunna
Those rooms are fantastic! I’ve loved seeing them evolve. Your playroom gives me inspiration since we will be giving ours a face lift this fall. Thanks!
Thanks, Brenna!
🙂
shaunna
You have created amazing rooms! Thanks for sharing your unique talent for creating stylish and functional spaces
What a beautiful space to be sit and be inspired – I’m sure those skylights help! Lovely 🙂
I’m new here too, and these rooms are absolutely gorgeous! Thanks for re-sharing them! I’m in the process of building a house and love this decor as inspiration!!
Hi there!
The transformation is just fabulous! Any chance you can share where the fun rug is from in the last photo? The one under the desk?
Thanks,
Anna
Hello, everything is going sound here and ofcourse every one is sharing data,
that’s genuinely fine, keep up writing.
the shelves that are in your writing room, how did you make them? They do look like Restoration Hardware. Just fabulous the work you do.
Thank you Amanda! My husband built them for us–I’ll see if I can get him to write up a tutorial.
🙂
shaunna