
The kitchen is mostly done, with only some lighting and decor left to install. Counters are in, cabinets are in, and just a week or two ago, we finished the backsplash & some open reclaimed wood shelving over the desk area.

I’m in love with how it’s all turning out. We went with basic white subway tile for the backsplash with white grout. I know people have differing opinions about white vs. gray vs. dark gray grout for subway tile, but at the end of the day, I love the simplicity of clean white backsplash.
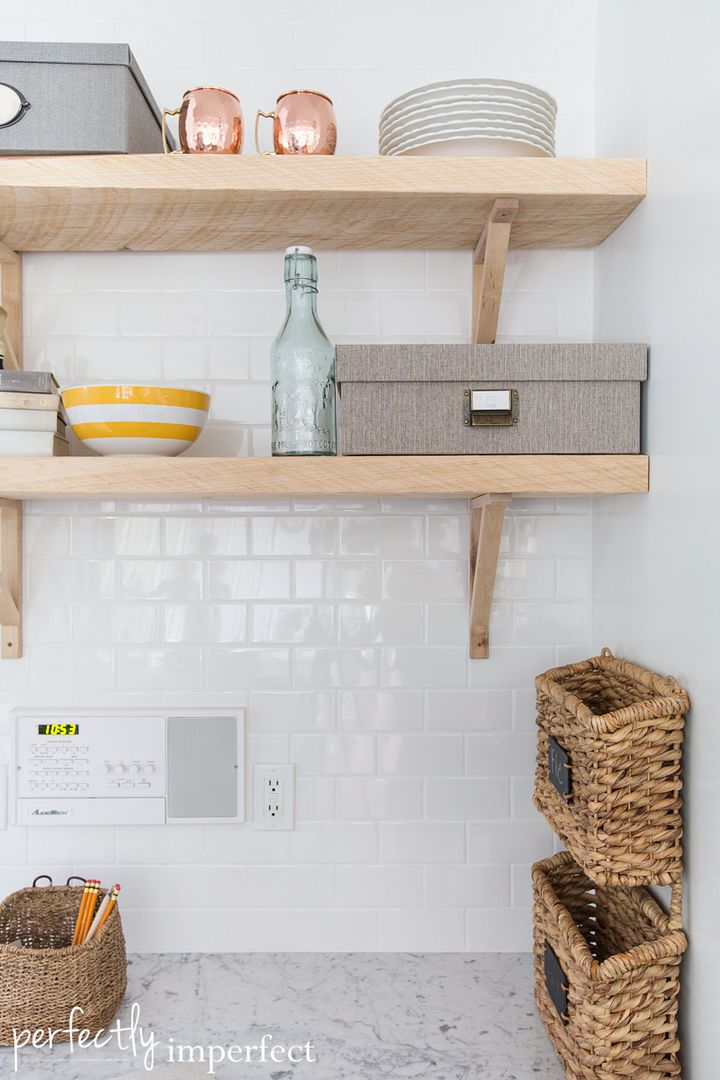
Matt just installed the reclaimed wood shelves using rough cut lumber (which I’ll probably warm up with some sealer), and some inexpensive Ikea brackets.
Matt’s tips for hanging shelves on top of tile backsplash:
- Use a stud finder to find studs before you tile so that finding them is easier.
- In this case, we had tiled already. We used the space under the desk to find the studs in the wall.
- Tape the tile first with painter’s tape to keep it from cracking. This will also prevent the bit from “walking” or moving around on your surface.
- Measure and place your marks on the tape where you’ll hang the brackets on the wall.
- Pre-drill your holes (using your painter’s tape guide) with a special Glass and Tile Bit Set. We got ours here.
- Use 2 1/2 inch wood screws to attach your brackets to the wall.

This little nook breaks up all the white cabinetry, and plus, it gives me somewhere to display some pretty dishes and accents. We left two edges natural and raw so that the wood brings some movement into the little block-shaped nook.
We’ll have more updates to share on the kitchen soon!


Looks really great, I love the white tiles as well! Thanks for sharing and have a great day. 🙂
Thanks, Debra!!
🙂
shaunna
Now to convince the Hubs that we need to do this to our kitchen 🙂 Great job!!
Looks so great! I just purchased the wood brackets from Ikea..love them…have not put them up yet and wonder what measurements you used for the shelves. depth of the shelf board? I was thinking 12 inches so a plate would fit on it….and how thick is your shelf board?
Thanks so much and keep those ideas coming! Diane
pretty! I want to touch it all.
Really nice use of space
I am loving the white subway tiles. Can you please tell me the size of your tiles? Where they were purchased?
I have always questioned my decision to use white grout with white subway tiles in our bathroom but seeing this makes me feel more confident that I did the right thing! It looks amazing!
I have subway white in my bathroom – and yes, to white grout!! Can’t wait to see the whole kitchen.
I was pretty pleased to discover this page. I need to to thank
you for your time for this fantastic read!! I definitely enjoyed every bit of it and i also have you book
marked to look at new things in your site.
Looking awesome! The cabinets are amazing as well, where did you get them from?
It’s looking great! The white tiles were a great touch 🙂 Thanks for sharing!
very useful post! I’m responding on upper comment : “Who needs another upgrade? Be prepared to get new software for your Mac”?.
This is absolutely great. All of it!
I especially love how rustic and old-school some things look 🙂
Cheers!