
I know you thought back in January when I first mentioned the writing room you would be getting some reveal shots any day. Little did you know that you would just be getting bathroom shots in August.
Sorry, girls, this DIY business is rough.
Remember the before? This is what it looked like in April…

Here it is now…

I love it sooooo very much. I wanted an escape from nasty paint clothes (and paint speckled feet), sweet toddlers who mean well but you know, wear you out, the mile-long to do lists, and I feel like that’s just what I got. Believe it or not, it was done on a budget, as was the rest of our attic addition.
Because I know you ladies love some details (and I am pretty excited to share them), here’s the scoop on the room.
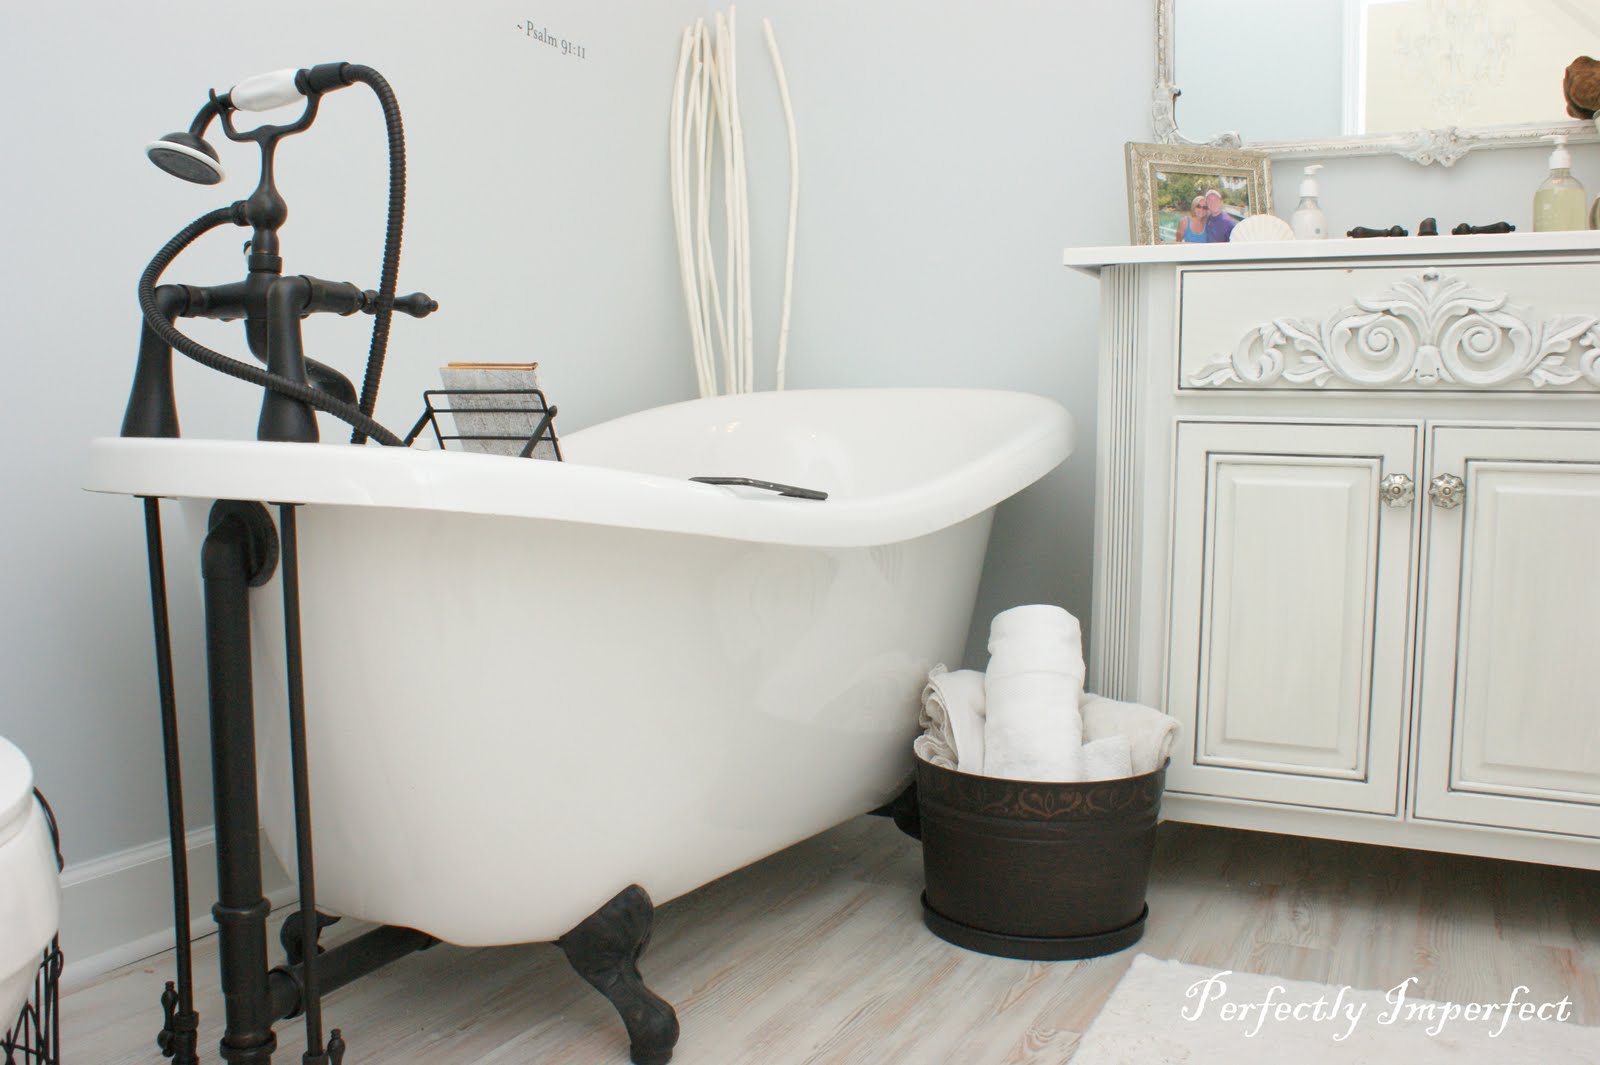
The clawfoot tub. Oh, the tub. It is, without a doubt, my favorite part of the upstairs. I have been pining for one for a while now, and we went back and forth on the most economical way to get one.
I researched for months on restoration and re-coating of porcelain tubs…that alone was going to run $300-500 just to refinish the inside, not including the cost of the tub or recoating the outside. Yes, we could get one for $30 off of ebay that was coated in rust, but it might take $500 or more just to get it back to working condition. Even then, companies wouldn’t guarantee the porcelain wouldn’t crack. Then we began shopping for the fixtures and plumbing, and quickly realized we were going to be spending $500 on those. While we knew the tub was our splurge and main expense, we hated to sink money into something that might have to be replaced. We eventually found a fiberglass tub at American Bath Factory, and our purchase included the oil rubbed bronze fixtures, giving us a brand new tub!

We are all about building our own cabinetry, but we chose to have the vanity built to resemble some storage I have in the writing room. It is gorgeous. Funny story…..
Our attic stairway is pretty tiny, and I felt really badly for the guys hauling these cabinets up (plus matt’s bar and my office storage), so I went up to ask if they needed any help, etc., only to find that the cabinets were all the wrong color. They were off white, and I mean like, really off white….like brown. I had wanted a light grey glaze on top of white. I felt terrible and begged them not to hate me, but told them it wasn’t what we had talked about. I described it and even showed them the table I had shown their partner. I tried to describe a grey glaze and bless him, he asked me if I had a small piece I could put it on and show him. So I did what the man asked. But when I wrote the check, I was thinking, “and why didn’t I do this myself???” 🙂

I wanted to have some kind of script on the wall or maybe something architectural. When I found this scripture, I knew I would love to have that running through my mind daily. And while the white “limbs” are not exactly what I was looking for, they were a budget compromise from Walmart and they did the job of adding interest but also balancing the romantic mirror and vanity with some contemporary flair.

I made time for a few small DIY projects as well. This great bath caddy my sis-in-law gave me my first Christmas with Matt’s family definitely fit the bill for storage, but I added a coat of oil rubbed bronze to it to match the tub fixtures. And I finally made use of the tiny soaps we have been stealing collecting all these years.

And a wider view…

I am a huge fan of piles of candles. Pillars, tapers, votives…doesn’t matter. Using the galvanized bucket to hold such romance seemed to achieve that same feel I had been going for.

Before I forget, the wall color is the most perfect balance of grey and blue, Benjamin Moore’s Iceberg. Matt laid the floors in here as well as the rest of the attic. I had strong ideas regarding flooring….I really wanted a whitewashed look, but it was going to cost a fortune to buy the right hardwood suitable for washing ( and durable enough for two toddlers). We also found that a whitewashed laminate was one of the most expensive laminate choices. Of course. We just happened in a flooring liquidation center and we found this flooring clearanced for $1.02 per sq. ft. We snagged it on spot.

And yes, those are anthro mercury glass knobs. They were $8 a piece, but there were only two and honestly, I couldn’t picture anything else on this cabinet.

Adding elements like the driftwood really grounds the space for me and gives the elegant a little rustic.


Love these ceilings! I printed off some botanicals from the Graphics Fairy and framed them in some cheap frames I painted.

They started as wood tone ($3 each), and I painted them oil rubbed bronze. I then used a wax crayon to highlight all the grooves…this ensures when you distress you only sand down to the next layer of paint and not to the wood.

The view looking into the writing room and the daybed.
Don’t you just need a place to escape? A place that’s you, but still, just one side of you….the “spa maven” you.
Okay, whatcha think?
Looking forward to hearing your comments since I’ve been teasing you with this thing for a bit now.
I’m having some tests run this week so I’m not quite sure on the status of posting. If you don’t hear from me, know that I’m probably in the middle of a waiting room somewhere…I’ll keep you posted!
linking to The CSI Project
**linking to the paties listed in my sidebar and under Friends and Inspiration.**


that room is BEAUTIFUL, shaunna!!! i LOVE it! LOVE LOVE LOVE it!!! every single thing!
The bathroom looks great. I can see you will enjoy soaking all your troubles away. Great job.
Over the moon gorgeous Shaunna!!! Absolutely beautiful! I'd not change a thing myself …
I'am truly so in love with this room!!
wow! I LOVE LOVE LOVE it! I SO want to soak in that tub! What a peaceful, romantic space!
So beautiful! We desperately need to update our master bath and I'm collecting inspiration photos for when we start… these are going in my folder!
I know you will enjoy for years to come the beautiful space you and your hubby have created! What an awesome job on researching, purchasing, and repurposing those special items to make the whole thing come together:) Stunning wall color and choice on the tub:)
What a gorgeous place to escape!! I LOVE the wall color and the tub and the knobs… ok I love it all! Enjoy your alone time!
What an amazing place to escape. It is go gorgeous and calming. I love it!! You all did a wonderful job on everything. Love & blessings from NC!
Oh this looks so great! I love all the white. It's so calming, elegant, and cozy all at the same time. And, yah, I'm super jealous of that bathtub. I'm still dreaming of my own someday.
Oh I LOVE it!!!! What an awesome job!! I'm also jealous about the bathtub. I could soak for hours!!
Your bathroom looks amazing! I love it. Looks like it should be in a designer magazine. Great job!
unbelievable! I'm in awe it's sooo beautiful. You have a sheer talent…and a beautiful space.
your bathroom really turned out perfectly. soooo beautiful, what a pleasure it will be to soak in that tub.well done~~~
Shaunna, I am so jealous to that clawfoot tub. I have been wanting one for a long time, too. I love everything you did in this space. You mentioned the branches behind the tub. I was thinking (if one would fit) an old chippy ladder leaning against the wall there with towels over a couple of the rungs. Just a thought.
Very pretty. I love the color scheme and attention to detail.
Hey Shaunna! I love your bathroom! The mirror is absolutely beautiful as is everything else in the room, and I do love the scripture…
Absolutely beautiful. So happy for you.
Wow, what a fabulous makeover, the bathroom is gorgeous. You are going to love having a soak in there! Nice job. 😉
I think it's stunning! You guys did an amazing job with all of it.
Hey Shaunna, it looks beautiful! I love that clawfoot bathtub…how relaxing that will be! The details on the mirror are gorgeous!
It's so lovely and looks very relaxing like a spa. Another great job!! I love that scripture on the wall!
Gorgeous! It looks so serene.
All I can say is …..drop dead gorgeous!
That bath is gorgeous! Definitely a relaxing hide-away. Congrats on such a beautiful room! Oh, I'm so glad you included details, I LOVE getting to see all the thought that goes into projects like these.
The bathroom is so beautiful. I am speechless. it is so beautiful.
I.Love.this….
BEAUTIFUL!!!! I would never want to leave.
Shaunna, I truly can't contain myself. I keep scrolling back and forth, back and forth – I can't take my eyes off this room! Love it to bits.
It's beautiful! What an amazing remodel! I'd love it if you'd stop by my Topsy Turvy Tuesday Link party and add this fantastic job!
OH MY GOSH, Shaunna! This is stunning! I love it. I can't even put into words how much I love this bathroom. It's heavenly. Do you mind if I share your bathroom on my blog on Wednesday? I usually (although I'm a bit behind) do a "Peeking in so-and-so's Windows" post on Wednesday. Would love to share your home if it's okay. Unbelievable. Popping your button on my blog after this one!
Shaunna! I can't believe how envious I am of you…I want this space so badly…oh the part you wrote about escaping from the sweet toddlers (who meant well) I want that! lol Such a beautiful space hun! Wonderful job! Enjoy!
That is seriously one of the most amazing bathroom I've ever seen…no joke! You have mad skills!
Wow! How peaceful! Love the scripture.
Oh my gosh! It is my dream to have an attic retreat! Right now, we live in 828 sq feet and the house is a flat top roof, so when we do a roof, we will pitch it, and my hope is that we make a master attic retreat. I'm dreaming big for our small space, but your pictures are just amazing and make me think that this is do-able! Thanks for sharing with the world and inspiring us 🙂
You did an amaaaazing job with the bathroom! I am in LOVE!!! It looks so very peaceful and the scripture verse is just PERFECT!!
Just heavenly!!
Stopping over from DIY…this is georgous and you did an excellent job!!
Shaunna, my dear, this is fantabulous! You are amazing!
Wow! What a amazing bathroom, I would never leave :)
What more is there to say….it is so dreamy and beautiful. WOW what a beautiful job.
That has got to be one of the most peaceful looking bathrooms I have seen! I love the flooring and the cabinet! And the ceiling! You did a great job.
Oh my gosh…the space looks so serene! I love it! Can I ask you how much you ended up paying for your tub?
So eye-catching…stunning!
I now know what color to paint my hideous powder room vanity- thank you! that light grey glaze is lovely.
I am a new fan—wow, this room is amazing. You guys did a great job and I appreciate all the details for us DIYers. One thing, what brand of Oil Rubbed Bronze paint did you use? I recently bought some and thought it looked pretty bad…your paint looks great.
The most beautiful bathroom I've ever seen! I'm about to do a mini makeover on my bathroom and I thank you for the inspiration. I'm a new follower.
how gorgeous!
Just so very beautiful…love the bathtub and your floor oh, and the knobs!
Your bathroom is AWESOME!!! LOVE all the details….right down to the knobs. Great job!
Hi there!
Your bathroom is AMAZING! It looks so dreamy.
Gorgeous! We have a refurbished, antique clawfoot tub in our master bath. (honestly – it is probably my favorite thing in the house!)
Wow! Just perfect. Wonderful job!
Wow it's so beautiful! We are renting right now…but I would love to do a transformation like this someday:)
This is one of the prettiest bathrooms I've ever seen! I'm just in love with the whole thing! Color, style, claw-foot tub… Amazing!
Wow – it is GORGEOUS!!! I love it. That tub is so pretty and the cabinet looks wonderful. Beautiful beautiful project!
Amazing. SOOOOOO pretty! The flooring that you found, is it a laminate? I couldn't tell from your description…we have a Lumber Liquidators near us, but I've not stopped in.
Everything is just perfectly appointed, to the point of beautiful perfection…I so love it, and I love seeing how you used all the SLaHOME things! They fit in there so beautifully!!!
Just beautiful… you've given me a few ideas for our bathroom reno.
Shaunna, what a beautiful space! I am drooling over the tub. I had no idea you could get a clawfoot tub in fiberglass!!! We've also thought a lot about buying an old clawfoot tub and rehabbing it. Yours looks beautiful.
Wow. That's all I can say. Love the color choices and totally jealous of that tub! I've always wondered if it was worth trying to restore a clawfoot… If we are ever in the market for one, I will consider your comments.
gave you an award at my blog
That is one of the most relaxing bathrooms I've ever seen! You did an incredible job!
Simply gorgeous!! LOVE your redo 🙂
That is the most gorgeous tub I've ever seen. You did an amazing job!
This is just a dream bathroom!! Enjoy!
New to your site, absolutely adore your style. You are very talented and your style…including the spirit and soul you put into all of your designs is very inspirational. I absolutely love your vanity. Wish you were closer I would love a replica! Bless!
Question: What type of wood did you use for the ceilings? We tried for a similiar look on our ceiling but could only find wood that had knots visible. Even after priming the wood multiple times, the knots began to show through within months. Any recommendations?
Hey Jackie! It was just tongue and groove pine…and yes, after 1 year, our knots began to show through on some boards…but not all. It doesn’t bother me, but it might if it were every board.
🙂
shaunna
Shaunna…I am drooling over of all of your talents put together so lovingly here in this master bathroom! The first thing I noticed was the lovely scripture verse..which sets the tone so beautifully! May I ask where you found the resource for this lovely Calligraphy? I assume it’s either perfectly hand painted, or some kind of press on vinyl piece you ordered. Could you share how you had this done?
Next…I noticed the lovely claw-footed tub, and that gorgeous mirror! Simply divine! <3 And keeping your palette light and breezy also sets the feeling of an open window …and your choice of the icy aqua blue wall color is perfection! It all adds up to serenity, peacefulness, and an oasis of quietude! What woman wouldn't covet this bathroom? You did an amazing job on this bathroom spa! <3